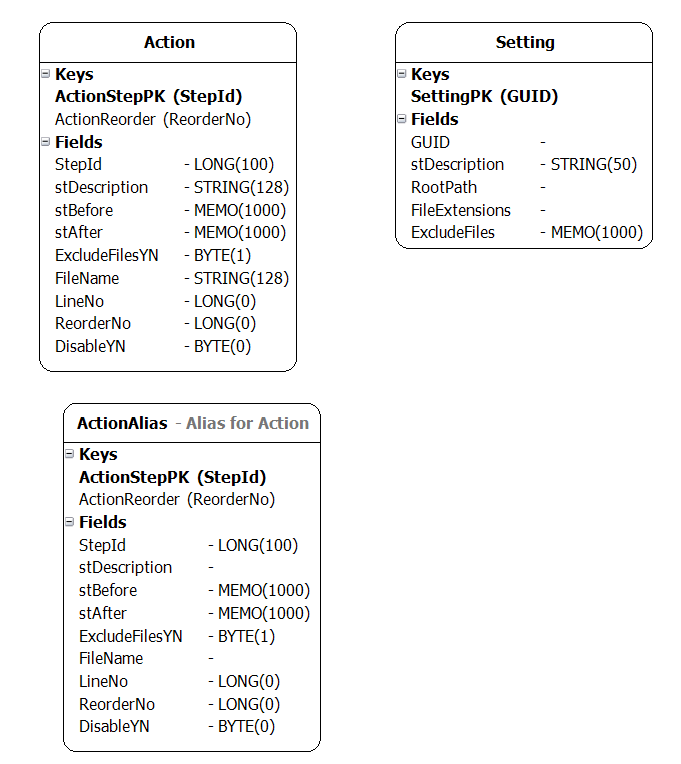
Let's have a look at the data structure. This is a one-pass program, so you can only process one root folder at once. So there is no relationship between the tables.
We need an
alias of the "Action" table to be able to reorder and renumber the Actions. There is a hidden "ReorderNo" field that is used for this purpose, with a reverse order index to assist too. More on that later.
There is only a browse form for the "Action" table, since the "Setting" table has only one record. The "MainDashboard" form doesn't link to any particular table. The values displayed on the form are mostly global variables, so they can be updated from any of the source procedures ("business rules") that have been written for this application.
Since I like to use the
CapeSoft WinEvents Global Extension to display the program version number and other information, I added in the System Information form by modifying a demonstration form from
WinEvents because I was curious to see how much RAM would be used by the program.
One of the templates that are modified is "versionres.tpl", shown here while it is in use. It's always one of the first Global Extensions I select. The modification was to make the text a bit bigger. As you can see from this screenshot, it is working. The global templates in use are listed here:
- ABC Defaults ($10) is a simple template which allows you to set the default value for some ABC class properties. Set it and forget it.
- dpiAware Fix (download) freeware written by Mike Duglas to correct an error in the generated manifest file.
- StringTheory 3 ($97) is a string object on steroids. Over 200 methods for parsing, manipulating, creating, compressing and encoding strings. Makes you extremely productive.
- WinEvent 5 ($169) is a wrapper around the Windows API. This library provides just about everything: Taskbar, AutoApp Shutdown, GSM, Force windows on desktop, Comms 232 and a host of other functions.
- AJE Backup ($99) is an Automatic Backup Template for Clarion. Configure it for your application, and it will make a numbered backup of key files every time you do a successful build. You don't need it to run the application, but you need it while developing the application.
- UltimateDebug is the ClarionLive debug template, part of the Ultimate Utilities pack. More on this later in the article.
- cwVersion is Clarion's built-in version template.

In
WinEvents, this is how you get the EXE version and put it into a global variable.
Global Variables and Properties
A number of global variables are defined in the dictionary. I prefer to do them there than in the application itself, just to keep things organised. In the Global Embeds section, take a look at the "Global Data" section. I have defined two queues:
!// This is a (risky) global queue, partially based on the queue
!   structure needed by DIRECTORY function
clFiles             QUEUE,PRE(CLF),THREAD
name                    STRING(FILE:MAXFILENAME)
path                    STRING(FILE:MAXFILEPATH)
uname                   STRING(FILE:MAXFILENAME) ! UPPER(name)
attrib                  BYTE
scanned                 BYTE
excluded                BYTE
                    END

!// This is a (risky) list of excluded file names
clExclude           QUEUE,PRE(CLE),THREAD
name                    STRING(FILE:MAXFILENAME)
uname                   STRING(FILE:MAXFILENAME) ! UPPER(name)
wild                    BYTE  ! Contains wild cards
                    END
Why risky? In a normal application with multiple things going on, it is possible for the queue buffer to be changed by different threads at the same time. This has been covered by Bruce Johnson in
ClarionLive #600. In this application, only one thing can happen at a time, so it made sense to make the queue definitions global, so they could be manipulated from various procedures as needed.

If you go to the Project Options page, here are the settings:
Don't leave the icon field blank. Put the icon for your application there. With websites like
flaticon.com there are plenty of icons to choose from.
Some of these options are explained in the recent
Clarion Build Events post, and the older
Backing up your Clarion projects article.
When you go to the "Global Properties" tab and click on the "Actions" button, don't forget to put your name (or the company name) as the author, and choose the application icon instead of leaving it blank. Leaving the icon blank will default to the "waframe.ico" icon on all forms where no other icon is explicitly set.
Personally I think your application should be professional enough to warrant its own icon, especially when it is so easy to do.
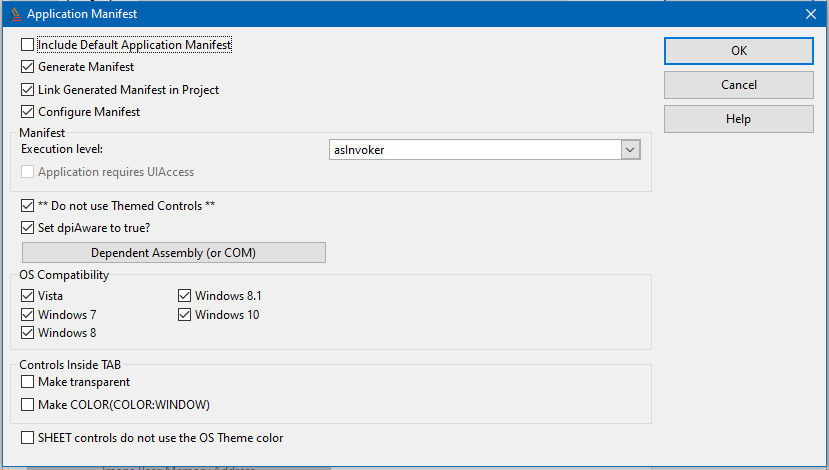
Go to the second tab ("App Settings") and click on the "Application Manifest" button. The settings shown will help with
making the user interface more helpful, and disable the unwanted UAC prompt every time you run the app.
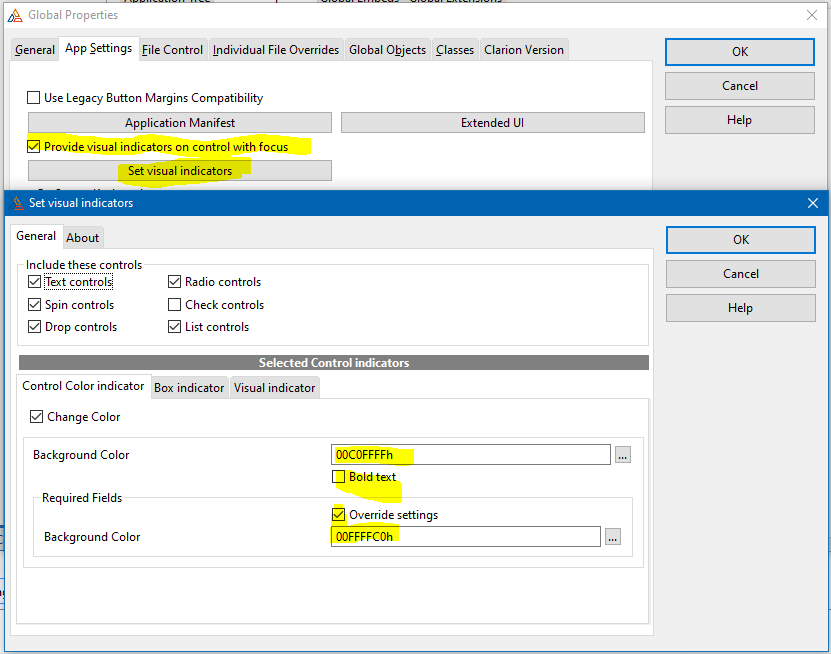
The "Set Visual Indicators" window has some useful settings too. You can see these in action when you are running the application, providing cues for adding or modifying fields in change mode. See the "
Change Mode vs View Mode" article.
Remember: good layout is invisible, it just draws you in to the important parts of the screen. Bad layout is immediately obvious, and confusing.
The Main Frame
The "Main" frame is the first thing the user sees, so try to make it look professional and pleasing to the eye. Make sure it has a meaningful title, usually the full name of the application. Put the customer's logo in the background, or the application logo, depending on the circumstances. Don't make it too "busy" or too "cute". I am showing the version number and the name of the workstation running it. I changed the "Browse" menu to "Data" and made it bold, indicating its importance.
Select the "Main" frame and click on the "Embeds" button on the right-hand side.
Click on the "Expand Filled Nodes" button and find the "OpenWindow" embed point. Click on the "Filled Source" button to view the code in the Embeditor.
      ! Get the EXE version number and global values
      ! (c) 2022-2023 Black and White Inc
      !dbg('COMMAND: ' & COMMAND(''))
      glo:dbugoff = FALSE  ! Do not suppress debug messages
      glo:AppVersion = 'Version ' & CLIP(ds_GetFileVersionInfo())
      glo:MachineName = clip(ds_GetWorkstationName())
      0{PROP:StatusText,3} = clip(glo:AppVersion)
      ! Display the version number in the main status bar
      0{PROP:StatusText,2} = clip(glo:MachineName)
      ! Display the workstation name in the main status bar
      !// Get the setting data
      Access:Setting.Open()
      Access:Setting.UseFile()
      If Records(Setting) < 1
          Access:Setting.PrimeRecord()
          set:GUID = glo:st.MakeGuid()
          Access:Setting.Insert()
      else
          set(set:SettingPK)
          Access:Setting.Next()
      End
      glo:AppDescription = set:stDescription
      glo:RootPath = set:RootPath
      glo:FileExtensions = set:FileExtensions
      glo:ExcludeFiles = set:ExcludeFiles
      !dbg(set:GUID)
Notice anything wrong with this code? No error checking! I broke my own rules!
This code uses
WinEvents to set the global values of glo:AppVersion and glo:MachineName, and then displays the results on the main status bar. Next, it inspects the contents of the "Setting" table and creates a record if it doesn't have any. Then it loads four of the fields into corresponding global variables so they can be displayed on the Main Dashboard later.
Click on the "Previous Filled Embed" button to go to the top of the Embeditor code. I always include Dan Read's
Principled Programming summary as a reminder to write decent code and professional quality applications. Take a moment to read it, and then click on the green "Save and Close" button.
UltimateDebug and dbg Messages
Find the "dbg" source procedure and open it using the Embeditor. This is a small but very useful procedure during development, because it allows you to send messages to
DebugView++ to see what is going on.
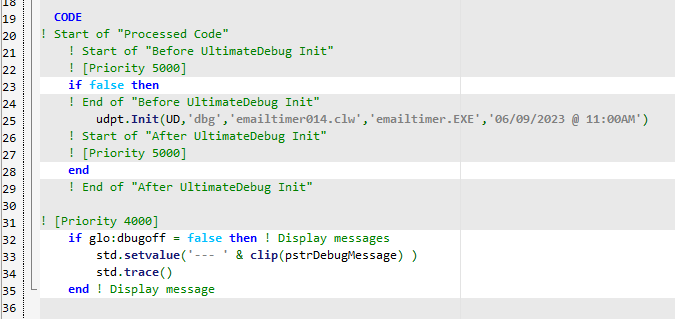
!// The purpose of this procedure is to display debug messages
!   This means you can enable/disable the UltimateDebug messages
!   without having to comment out a bunch of ud.debug lines
!   in your code
if glo:dbugoff = false then ! Display messages
    std.setvalue('--- ' & clip(pstrDebugMessage) )
    std.trace()
end ! Display message
That's all folks! It uses the
StringTheory Trace method to send information to the debugger. Why not use "
UltimateDebug" instead? Actually, I use both when I'm starting a project, so I can see how the procedures and forms are interacting with one another. See "
Adding Extensions to Clarion". At some point in the process, these messages start getting in the way and I just want to see my own messages. I used to write my own messages using "UD.Debug" but if you disable or remove the "
UltimateDebug" global extension you then have the tedious task of finding and commenting out all of these statements. So instead of using "UD.Debug" I use "dbg" instead. It displays the messages whether "
UltimateDebug" is in use or not.
When "
UltimateDebug" is in use, notice the extra
if false then
statement, and its corresponding "end" statement. This stops "
UltimateDebug" from adding in a redundant message every time you use "dbg".
To remove the "
UltimateDebug" stuff, first open the template and click on "Disable UltimateDebug template". Click "OK" and do a build. You will probably get a compile error or two. Now "Delete" the extension completely and do another build. This time there should be no further errors. If you want to turn off all the messages, just go the the "Main" OpenWindows code and change the value from
glo:dbugoff = FALSE
to
glo:dbugoff = TRUE
UpdateSetting
I don't like the way
Clarion makes the
primary key fields
editable by default. It's just asking for trouble. Ideally, primary key values should be generated before the form opens in insert mode, or at least only be editable during insert mode. After that they should be locked down.
Here is an example. The "GUID" value was generated automatically, so the field ENTRY control is disabled, flattened, made read-only, and is no longer the 1st field in the tabindex order. Give it a high number like 100 and the Window Designer will assign a more realistic number. The gap between "GUID" and "Description" is used to accentuate this.
Also, the "Description" control and prompt have the TabIndex values of 2 and 1 respectively, so the cursor will land in the "Description" field when you open the form. The "Description" field is the same width as the "Root Path" field, even through the former can't accept as many characters as the latter. Be careful not to make the controls much bigger than the amount of data it can support, because the user's input will be truncated without warning.
In the Window Designer you can drag fields onto the form, but when you drag a memo field (in this case set:ExcludeFiles) it comes across as an ENTRY control, not a TEXT control. So you can resize it as required, and then close the Window Designer and go to the Window Properties screen. Here I have changed the highlighted (set:ExcludeFiles) control from "ENTRY(@s255),AT" to "TEXT,AT" to get a more useful input control.
Please take a look at my post "
Change Mode vs View Mode" for an explanation of the additional code in the Window.Init embed points of WindowManager, both on this form and on the next one.
UpdateAction
This form has a number of interesting features. There are "Paste" buttons to take the text from the Windows Clipboard and paste it into the "stBefore" and "stAfter" fields. If you look at the "Accepted" embed points for these buttons you will see the code that does it.
The "act:FileName" and "act:DisableYN" fields needed some special attention on this form. When the user sets the "act:DisableYN" check box to TRUE, I wanted to grey out the "act:stDescription" field and change the highlighting of the "act:StepId" field. When the "act:FileName" field is empty, I want to disable and empty the "act:LineNo" field because you
can't have a global line number, only one for an
individual file. The code to do this is kept in two routines, and they are called from the relevant control's "All Events" embed point, and the "OpenWindow" embed point for when you open an existing record.
The other item of interest is the "
Next Step No" button. For this table, I could have had the primary key as a GUID, and "StepId" as an indexed field, but it seemed over-complicated for a simple table with not many records.
So I broke my own rule about not changing the primary key.
I want the step numbers to start at 100 and go up in steps of 10, with the flexibility of being able to add in steps in between other ones. So this is how I calculate the next step, using the
alias to the "Action" table, since we are busy inserting/editing an "Action" table record:
CalcNextStep        ROUTINE
    ! Find the largest step number, add 10
    loc:StepId = act:StepId ! Save the current step number
    lngStepIdmax = 0      ! Start
    !// Open an alias of the table so as not to screw things up
    Access:ActionAlias.Open()
    Access:ActionAlias.ClearKey(act1:ActionStepPK)
    SET(act1:ActionStepPK)
    LOOP UNTIL Access:ActionAlias.Next() <> Level:Benign ! Next
        if lngStepIdmax < act1:StepId then ! lngStepIdmax
            lngStepIdmax = act1:StepId   ! The new max
        end ! lngStepIdmax
    END ! Next
    Access:ActionAlias.Close()
    if loc:stepId <> lngStepIdmax then
        ! Add to the most recent step to get the new one
        act:stepId = lngStepIdmax + 10
        ! unless we already have the largest number
    end
Notice the lack of error checking? What was I thinking?
BrowseAction
Calculating a new primary key value is one thing. Renumbering an entire table is something else entirely. Firstly, it's dangerous and difficult. Secondly,
primary key values aren't supposed to be changed without a good reason and careful consideration, if at all. But I did it anyway. Why?
I want to be able to insert steps because the order in which the replacements are done is important. so let's assume we have a StepId sequence like
100, 110, 112, 113, 120, 130, 140, 150
and I would like to add in another step between 112 and 113. I could change 113 to 114 and then insert a new 113, but if I'm going to change the primary key value of one record, I might as well go the whole 9 yards and renumber all of them.
If I start renumbering from the lowest number, it won't be long before I am trying to change 120 to 140, but there is already a step number 140, which will result in an error. What I need is an
intermediate field. In this case it is "act1:ReorderNo".
RenumberRecords ROUTINE
    !// First pass: update all the act:ReorderNo fields
    Access:ActionAlias.Open()
    Access:ActionAlias.ClearKey(act1:ActionStepPK)
    SET(act1:ActionStepPK)
    loc:StepId = 90
    LOOP UNTIL Access:ActionAlias.Next() <> Level:Benign ! Next
        loc:StepId += 10
        act1:ReorderNo = 1000000 + loc:StepId
        Access:ActionAlias.Update()
    END ! Next
    Access:ActionAlias.Close()
    !// Second pass: update all the act1:StepId fields with
    !   big numbers
    Access:ActionAlias.Open()
    Access:ActionAlias.ClearKey(act1:ActionStepPK)
    SET(act1:ActionReorder)
    LOOP UNTIL Access:ActionAlias.Next() <> Level:Benign ! Next
        act1:StepId = act1:ReorderNo
        Access:ActionAlias.Update()
    END ! Next
    Access:ActionAlias.Close()
    !// Third pass: update all the act1:StepId fields with
    !   correct step numbers
    Access:ActionAlias.Open()
    Access:ActionAlias.ClearKey(act1:ActionStepPK)
    SET(act1:ActionReorder)
    LOOP UNTIL Access:ActionAlias.Next() <> Level:Benign ! Next
        act1:StepId = act1:ReorderNo - 1000000
        Access:ActionAlias.Update()
    END ! Next
    Access:ActionAlias.Close()
Again, no error checking! This is just wrong.
In the
first pass through the table, using the
primary key sort order, I can calculate a new sort value and place it in the "act1:ReorderNo" field. To prevent the renumbering clashes, I am adding one million to each new step number. In the
second pass I am using the
reverse order of "act1:ReorderNo", so the biggest StepId is replaced first, with a much higher number. In the
third pass we return to the primary key sort order, and deduct the million from each StepId value, so we get step numbers starting at 100.
If you inspect the List Box Formatter, you will see the use of a picture
@n~Y~1B
which is a hack to display a "Y" if the value is true, and a blank of the value is false. This is discussed on
ClarionHub in great detail, including the "proper" way to do it.
Processing the Files
This is where the file processig gets done. First, we create a queue of file and folder names in the global "clFiles" queue. To achieve this, we scan the root folder and add in all folder names found using "DirectoriesOnly" procedure. Next, we parse the extensions list and get each extension wild card, using "DirFilesMask". Then we run "DirFilesOnly" for each mask. In this way, the queue grows with file and folder names. This is all co-ordinated by "DirAllFilesAndFolders" until all folder names have been scanned. Once all the folders have been scanned, these folder names are removed from the queue, leaving only the file names.
Another procedure creates a smaller queue, "clExclude", with just a list of the excluded files. As each file name gets added to the "clFiles" queue, a boolean field is set if the file is one of the excluded files. The final stage in the process involves looking at each file in the queue and applying all the Actions in the "Action" table, except those which are disabled. This is done by the "ProcessFile" procedure.
If the file is marked as an excluded file, then the excluded actions are also ignored. If the file mask for the action is empty, or the file mask matches the file name in "clFiles", then the Action is performed. Once all the actions have been tried, the new file contents are compared with the original file contents (both stored in
StringTheory objects) and if they differ, the old file is renamed with a .bf extension, and the new file is saved under the original name. The file path is also added to a list of changed files, which is eventually saved in the root folder as "clFiles.txt".
The Main Dashboard
Here is the "Main Dashboard". Clicking on the "Process the Files" button will cause the "DirAllFilesAndFolders" procedure to process the files according to the values shown on the form. The line of text near the bottom of the form is based on the "glo:ProgressMessage" global variable, so it can be updated by any of the procedures mentioned above.
I'm pretty sure I have broken all kinds of "good programming" rules by relying so much on global variables, especially the global queues. I also don't have enough knowledge of CLASS definitions to modify the supplied classes, particularly the PRIVATE class elements, to offer any change actions in this version of clFixer. Please leave comments below or contact me directly to help me improve this code and make it more professional.
Feedback
Monday 16 October: Well, this is embarassing. I didn't put
any error checking code in the app! Didn't even follow my own advice. So now I'm working on version 0.2 that includes error checking. So much for professional code! Thanks to Geoff Robinson for pointing this out privately, and for several other improvements, espcially in the way I have been using StringTheory.
Friday 20 October 2023: Following feedback and further insignts from Geoff Robinson and
ClarionHub, the
download is updated to version 0.2