This follows on from
Learning Clarion (Part 2). Now that we have finished defining the data dictionary, we will import some data into the tables.
Lesson 5: Importing Existing Data
You may have existing data from legacy applications that you want to save and use in your
Clarion application. So this chapter shows you:
- How to import a table definition from an existing table.
- How to browse and edit a table using the Database Manager.
- How to convert data from one table format to another.
First, we need to open the LCLesson.dct dictionary file.
Importing a .CSV File Definition
One easy way to convert tables is to export your old data from the previous application to Comma Separated Values (.CSV) files. This is the file format originally used by the Basic language. The data is contained in DOUBLE-quotes, commas separate fields, and a Carriage Return/Line Feed separates records. Clarion’s BASIC file driver will easily read from and write to these .CSV files.

We will import the definition of an existing .CSV file containing Customer data, then generate a simple table conversion program (to show you just how easy it is to do) to place the data into a TopSpeed (.TPS) table.
In the "DCT Explorer", press the "Add" button drop list, and select the "Import Table" option.
In the "Select Server" entry, choose "Comma Delimited Files (Basic)" from the dropdown list. Press the ellipsis button to the right of the "Select Dictionary" entry to open the "Select Database" dialog. Alternatively, you can also press the "Next" button.
Select "C:\Users\Public\Documents\SoftVelocity\Clarion11\Lessons\LearningClarion\IMPORT1.CSV" then press the "Open" button.
In the "Driver Options" field, press the ellipsis button to open the "BASIC Driver String Builder" dialog. Locate and check the "First Record is Header" check box. Press the "OK" button to close the "BASIC Driver String Builder" dialog.
Once the wizard has finished, notice the "IMPORT1" table definition has been added to the dictionary.
View the imported data
Right-Click on the IMPORT1 table, select "Browse Table" to call the Database Browser. Or press the "Browse" button on the DCT Explorer toolbar (highlighted in blue above).
The
Clarion Database Browser allows you to directly edit the data in your tables. This is a programmer’s tool, designed to allow you to do whatever is necessary to change the actual data contained in your tables. This means that there are no safeguards against violating your database’s Referential Integrity or Data Integrity rules. Therefore, you must take care when you use this tool.
In this lesson, we do not need to make any changes at this time, and simply wanted to identify this IDE tool if needed.
Close the Database Browser at this time and return to the DCT Explorer in the already opened GSLesson dictionary.
The "Customer" data file doesn't exist yet.
Right-click on the "Customer" table name and select "Browse Table".
Answer "Yes" to create the file.
Close the empty table once it opens.
Generate a table conversion program
In the DCT Explorer, right-click on the "Customer" table, and select the following conversion option:
You can specify a table to convert from three different sources. The target can be directly on disk (using Data File), a table definition in the current dictionary (using Table Definition), or a table definition in another dictionary (using Table Definition from another DCT). We have chosen a table from our current dictionary.
Select the "IMPORT1" table as the data source and click "Select". The table that you select
first in the conversion program process is always the
target. In our example, the "Customer" table is the target, and "IMPORT1" is the
source.
The "Select New Project File" dialog appears. Accept the default name (convert.cwproj), and the default LearningClarion folder name, by pressing the Save button. Project files determine what source file to compile, and how to build (link) it. The default extension of project files is *.cwproj.
Select the target table file (Customer.TPS) and click "Open".
Another dialog pops up that asks you if you would like to load the data conversion program. Press the "Yes" button. The wizard completes, but the conversion project is not opened (No idea why). We will return to the conversion program shortly.
The best reason to generate
Clarion source code for the data conversion is to provide you the opportunity to modify the code before you compile and execute it to handle any special data conversion needs you may have. This makes the conversion process completely flexible to handle any situation that can occur.
Delete the "IMPORT1" file definition
The only purpose this file definition served was to allow the Dictionary Editor to generate file conversion source code for you. Therefore, we can delete it from the Data Dictionary right now.
Highlight the "IMPORT1" table in the DCT Explorer, and press the Delete button in the DCT Explorer toolbar. Press the "Yes" button when asked to confirm the deletion. Press the green "Save and Close" button to exit the Data Dictionary Editor.
Load the conversion program
From the "View" menu, select "Solution Explorer". If it doesn't open, click on the tab on the far right, shown by the red arrow. Expand the project to find the "Convert.clw" generated code, and click on the "Open" button (or double-click on the file name).
Clarion’s Text Editor appears with the file loaded, ready to edit. The Dictionary Editor created the conversion program code in this file. This contains all the
Clarion language source code necessary to read the data from the BASIC (.CSV) file and copy it to the TopSpeed table.
Scroll down until you find the routine called "AssignRecord". Change the line that reads
CUS:State = Source:State
to read:
CUS:State = UPPER(Source:State)
This will make sure that all the 2-letter state codes are converted to upper case during the transfer.
Also, comment out the two lines in the previous routine by using the exclamation point (see above). For some reason, the generated code tries to copy the Customer file over itself, and then deletes the original file, so the data is lost.
Click on the "
Save" button on the main toolbar to save your work.
Compile/Build and run the conversion program
The Dictionary Editor generated the Convert.cwproj file for you at the same time it created the Convert.clw file. Every
Clarion program has a project that controls the options for compiling the source code and linking to create the resulting .EXE file. For hand-coded programs (and conversion programs generated by the Database Manager), these settings are contained in a .cwproj file.
Click on the "
Start without debugger (Builds solution)" button to compile and build the program, and then run it.
This compiles the program, links it into an .EXE, then runs the resulting executable to perform the file conversion. A status window appears as the program runs, letting you know the progress of the file conversion. Since there are only a few records to convert in this case, you probably won’t be able to read it (it’ll go by too fast).
Choose "Close" from the "File" menu, "File" to close the program source file and exit the Text Editor. Then choose "File", "Close", "Solution" to close the conversion project.
Check it out
Now you can check the data in the new file by opening it with the Database Browser and browsing through the records.
Choose "Browse Table" from the "Tools" menu.
In the "Select Driver used to Browse the Table" dialog window, highlight "TopSpeed (TPS)" and press the "Select" button.
In the "Open TopSpeed File" dialog, press the ellipsis button, and select the "CUSTOMER.TPS" file, then press the "Open" button, then click "OK".
This demonstrates another way to open the Database Browser, other than from within the Dictionary Editor.
There are two obvious problems with this data. The first record is not data at all, but the names of the column headings. The other problem is that we can't see the ZIP codes.
Click on the "Format Columns" button, select "CUS:ZIPCODE" from the drop-down list and apply the "@P#####P" picture that we used in the
Getting Started exercises. Click on "Apply Formatting" and "Close". Now we can read the ZIP code data.
Notice that the data is sorted by default according to the first column. The first row (CustNumber = 0) is meaningless. It came from the "Header" record of the CSV file, so it's time to delete it. Click on the "Delete record" button at the bottom of the window. Then click on the "Save" button and close the file.
Make a backup of your work.
OK, What Did I Just Do?
Here’s a quick recap of what you just accomplished:
- You imported a table definition from an existing .CSV file.
- You used Clarion’s Database Browser utility to examine the contents of the .CSV table.
- You used Clarion’s Conversion Program utility to generate code to create a table conversion program.
- You compiled and executed a table conversion program to import data from a .CSV table into a TopSpeed table.
Now you’ve converted some valuable existing data to the TopSpeed table format so your
Clarion applications can use it. In the next chapter, we will begin building an application "from scratch" using the Application Generator.
Lesson 6: Starting the Application
With the
Data Dictionary complete, you now can use the
Application Generator to create your application. This chapter shows you:
- How to create the .APP file, which stores all your work for the project.
- How to define the first (Main) procedure to create an MDI application frame, and how to call procedures from the application’s menu.
We begin the lesson with an empty
Clarion IDE.
From the "File" menu, select "New", "Solution, Project or Application".
In the resulting dialog box, type in "LCLesson" for the application name, and remove the check mark from "Auto create project subdir". Click on the "Create" button.
Type in the dictionary file name "LCLesson.dct" or use the ellipsis button to select it. Remove the check mark from "Application Wizard" because we are going to do some steps manually instead. Click the "OK" button.
Creating the Main Procedure
The Application Tree dialog appears. This lists all the procedures for your application in a logical procedure call tree, which provides a visual guide to show the order by which one procedure calls another. You previously saw it in the
Getting Started exercises.
The "Main" procedure is the starting point. The lesson application will be an MDI (Multiple Document Interface) program. Therefore, the natural starting point is to define the "Main" procedure using the "Frame Procedure" template to create an application frame. A frame is a type of visual program-wide starting point, providing menus, toolbars, and other options.
Click on the "Main" procedure object, and then on the "Properties" button.
Click on the "Defaults" tab, and choose the "Default MDI Frame" template. Click "Select".
The Procedure Properties dialog appears. It defines the functionality and data structures for the procedure. Press the "Actions" button.
In the "Main – Properties" dialog, type "SplashScreen" in the Splash Procedure field, then click "OK". This names the procedure containing an opening screen that will appear for just a brief period when the user first opens the application.
Edit the Main Window
Usually, the first task when creating a procedure is to edit the main window. You can place controls, or if the procedure template has controls already, you can customize them.
The application frame itself never has controls.
Windows doesn’t allow it. We will, however, customize the window caption (the text that appears on its title bar). Then we will add items to the predefined menu, which is also built into the Frame Procedure template, and create a toolbar for the application (a toolbar can have controls).
Now click on the "Window" button to open the Window Designer.
The Window Designer appears. Here are all the tools that allow you to visually edit the window and its controls. On the far right, you should see the "Properties" pad. Click on it (red arrow above) to display the application properties. Find the "Title" property and click in the field to change it to read "LCLesson Application" as shown. (If the properties pad isn't available, you can select it from the "View" menu.)
Editing the Menu
From the Window Designer or Properties Pad, you can call the Menu Editor, which allows you to add or edit menu items for the application frame window. As you add each menu item, you can access the Actions dialog to name the procedure to call when the user chooses that menu item.
For each new procedure you name for the menu to call, the Application Generator automatically adds a "ToDo" procedure to the Application Tree. You can then define that procedure’s functionality, just as you are now defining the application frame procedure’s functionality.
When the Application Generator generates the source code for your application, it automatically starts a new execution thread for each procedure you call from the main menu (this is required for an MDI application).
In the Window Designer, click on the Menu bar and then the "Edit Menu" task at the bottom of the properties window.
Click on the "Paste" entry because we want to insert another menu below it. Then click on the "Add New Menu" button.
Use the "Menu Down" button to move it to the main menu level, and then change the text of the menu to read "&Browse" as shown. This defines the text that appears on the menu to the end user. The ampersand (&) indicates that the following character (B) is underlined and provides keyboard access (the user can press ALT+B to drop down this menu).
Press the "New Item" button (or press INSERT). This adds a new
menu item — a command on the dropdown menu — under "&Browse".
Type "&Customers" in the "Text" field then press TAB three times.
Type "?BrowseCustomer" in the "Use" field. (This is an equate for the menu item, so code statements can reference it. The leading question mark (?) indicates it is a field equate label.)
Next, click on the "Actions ..." button.
For the "When Pressed" setting, choose "Call a Procedure" from the drop-down list.
Type in "BrowseCustomers" in the "Procedure Name" field. This names the "ToDo" procedure for the Application Tree. Enable the "Initiate Thread" checkbox. Click "OK". The BrowseCustomers procedure will display an MDI "child" window, and you must always
start a new execution thread for any MDI window called directly from the application frame. The Thread Stack field defaults to the minimum recommended value.
Add the second menu item
Press the "New Item" button. Type "&Products" in the "Text" field and press TAB three times.
Type "?BrowseProducts" in the "Use" field.
Normally, the next step is to define the action for the menu item—what happens when the end user executes it from the menu. We’ll skip over this step for now, for this menu item only. Later, you’ll create a procedure by copying it, then attaching it to this menu, just to show you this capability of the
Clarion environment.
Add the third menu item
Press the "New Item" button. Type "&Orders" in the "Text" field and press TAB three times.
Type "?BrowseOrders" in the "Use" field. Click on the "Actions ..." button.
In the Actions dialog, choose "Call a Procedure" from the "When Pressed" drop-down list.
Type "BrowseOrders" in the "Procedure Name" field.
Check the "Initiate Thread" box.
Press "OK" to close the ?BrowseOrders Prompts dialog.
Fixing the Menu Font
Before we leave the menus, click on the top line "MENUBAR" and change the font to "Segoe UI"
Press the green "Save and Close" button to close the
Menu Editor.
Press the green "Save and Close" button to close the
Window Designer.
Press the green "Save and Close" button to close the
Procedure Properties dialog.
This returns you to the
Application Tree dialog. There are now three new procedures marked as "(ToDo)": "BrowseCustomers", "BrowseOrders", and "SplashScreen". These were the procedures you named in the Menu Editor. Choose "Save" from the "File" menu, or press the "
Save" button on the toolbar.
Creating the SplashScreen Procedure
We named a Splash procedure, and now we’ll create it.
Select the "SplashScreen" procedure, click on the "Properties" button, go to the "Defaults" tab, choose the "Default Splash Window" template. Click on "Select".
We will use all the defaults for now. Just type in "Startup Splash Screen" in the "Description" field. If you are like me and want to fiddle with the fonts and layout, click on the "Window" button. Use the green "Save and Exit" buttons to return to the Application Tree.
Save your work.
Adding an Application Toolbar and Toolbar Controls
Now we return to the Main procedure to add in an application toolbar below the menu.
Click on the "Main" procedure, and then on the "Window" button to the right. This opens the Window Designer directly.
For some inexplicable reason, every time I open the Window Designer, the "Control Templates" pad blocks part of the screen. The quickest way to remedy this is to click on the "Properties" pad on the right. See the red arrow above.
Open the "Toolbox" pad, and use the "pin" button to pin it in place on the left. This will move the window over to the right, so you can see it properly.
Scroll down and drag the "TOOLBAR" control onto the frame, and let go just underneath the menu bar. This will put the toolbar control in place. Next, we need buttons on the toolbar.
Scroll up the list of Clarion Window Controls to find the "BUTTON" control. Drag and drop a button onto the toolbar control, as shown. Move the button to the left of the toolbar, just below the "File" menu. Also, adjust the height of the toolbar, so the button fits nicely.
Press F4 to display the button properties. Use the delete or backspace buttons to remove "Button1" in the "Text" property field. Do not use the spacebar to replace the text with a space. There should be no text at all. Change the "Use" property to "?CustomerButton".
Find the "Icon" property and from the drop-down list click on "Choose File ...". The Select Icon File dialog appears. Select "GIF Files" from the Files of type drop-down list. Select the "CUSTOMER.GIF" file, and click on "Open".
Scroll down to find the "Tip" property and type in "Browse Customers". This adds a tool tip to the button that will display whenever the mouse cursor hovers over the button. Find the "Flat" property and toggle it to "True".
Scroll down to the "AT" property and expand it. Remove the check mark from the Height and Width's "Default" property. Next, set the "Value" property of the height to 14, and for the width set the "Value" property to 16.
At the bottom of the "Properties" pad, click on the "Actions ..." link.
For the "When pressed" action, select "Run a Procedure". Choose "BrowseCustomers" from the drop-down list. This is the procedure name you typed for the "Browse" menu "Customers" menu item. Pressing the button will call the same procedure. Often, a command button on a toolbar serves as a quick way to execute a menu command. Remember to enable "Initiate Thread" as before. Click "OK".
The second button
One way of adding a button is by drag and drop, which we did with the first button.
Another way is just click-and-click: click on the button control in the toolbox, and then click on the toolbar where you want the button to appear. Notice that the toolbar control is de-selected once you have created the button, to prevent another control being created when you click somewhere else. Move the button into place next to the Customer button.
Press F4 to display the button properties. Use the delete or backspace buttons to remove "Button2" in the "Text" property field. Do not use the spacebar to replace the text with a space. Change the "Use" property to "?ProductButton".
Find the "Icon" property and from the drop-down list click on "Choose File ...". The Select Icon File dialog appears. Open the "PRODUCTS.GIF" file. Find the "Tip" property and type in "Browse Products". Toggle the "Flat" property to "True".
Normally, you attach an action to the button at this point. Skip this step for now, for this button only. Later, we’ll copy a procedure, then call it at the point in the generated source code which handles what to do when the end user presses the button to demonstrate using embed points.
The third button
Drag and drop a button control onto the toolbar control.
Press F4 to display the button properties. Use the delete or backspace buttons to remove "Button3" in the "Text" property field.
Change the "Use" property to "?OrderButton".
Find the "Icon" property and from the drop-down list click on "Choose File ...". The Select Icon File dialog appears. Open the "ORDERS.GIF" file. Find the "Tip" property and type in "Browse Orders". Toggle the "Flat" property to "True". Click on the "Actions ..." link.
For the "When pressed" action, select "Run a Procedure". Choose "BrowseOrders" from the drop-down list. Remember to enable "Initiate Thread" as before. Click "OK".
Position and align the buttons
The Window Designer has a set of alignment tools that easily allow you to line up and resize your window controls.
With the "Orders" button still selected, Ctrl-Click on the "Customers" button. This gives both buttons "handles". With both buttons still selected, Ctrl-Click on the "Products" button.
Ctrl-Click is the "multi-select" action that allows you to perform actions on several controls at once. Once multiple controls are selected, you can move them all by dragging on any one of the selected controls, or you can use any of the Alignment menu’s tools on the entire group.
Now all three buttons have "handles", and the "Orders" button has the white handles that indicate it has focus and is the "key control" for the alignment actions. Click on the "Align Tops" button on the toolbar above, as shown. Notice how all the buttons have the same top position as the key control. Drag the group up to the top of the toolbar control, so they fit under the menu bar.
Click on the "Spread Horizontally" button to space the buttons evenly. Another way to do this is to right-click on the group, select "Format", "Horizontal Spacing", "Make Equal".
If the buttons are too far apart, use "Format", "Horizontal Spacing", "Decrease" to move them closer together. Make sure they don't overlap! We need more space to the right for what is coming next.
Add the Frame Browse Control buttons
At the bottom left of the screen, click on "Control Templates". Then click on the toolbar control to make sure it is selected. Choose the "FrameBrowseControl" template, then drag and drop just to the right of the 3rd toolbar button.
Move the buttons into position so they are neatly placed.
Select the toolbar control again, and change the AT Height value to 20 so all the controls are neatly positioned on the toolbar. Click on the green "Save and Close" button to save your work.
Testing an Application under Development
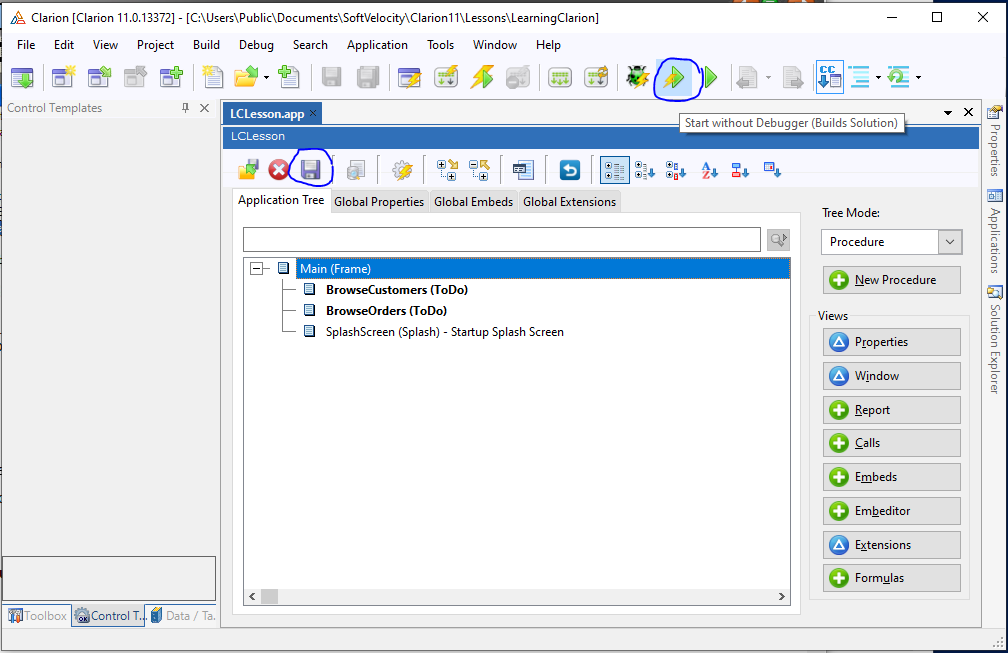
Before you test your application, always save your work. Click on the "Save" button. Then click on the "Start Without Debugger" button to Generate Source, Build and Run your application.
The Application Generator generates the source code, displaying its progress in a message window, procedure by procedure. Next, the Output window appears, showing you the progress of the build as the compiler and linker do their work. Then your Application window appears.
Press one of the buttons on the toolbar, or choose one of the items on the Browse menu. A message box appears that says, "The Procedure (procedure name) has not been defined".
This capability allows you to incrementally test your application, whether you have designed all the procedures or not. You’ll fill in their functionality, starting in the next lesson (Creating a Browse).
Press the OK button to close the message box. Choose "Exit" from the "File" menu to close the LCLesson application.
Throughout the rest of this lesson, feel free to Make and Run the developing application whenever the lesson instructs you to save the file.
Look at the Generated Source Code
Let’s take a quick look at what the Application Generator has done for you. The whole purpose of the Application Generator (and its Templates) is to write Clarion language source code for you. There is no "magic" to what the Clarion tool set does to create applications; it all goes back to the Clarion programming language.
With the Application Tree dialog open, change the "Tree Mode" drop list to "Module". This changes your view of the application from the logical procedure call tree to the actual source code modules generated for the application.
Highlight the "LCLesson.CLW" module, right-click to display the popup menu, then select "Module Source File".
This takes you right into the Text Editor, looking at the last source code you generated (the last time you pressed the Run button). Any changes you made since the last time you generated code will not be visible here.
The "LCLesson.CLW" file is the main program module for this application, containing the Global data declarations and code. Don’t be intimidated looking at all this code, we will discuss Clarion Language code in a subsequent lesson.
When you have finished looking at the code, go to the "File" menu, choose "Close", "File" to exit the Text Editor and return to the Application Generator (You can also simply press the Close button "x" in the source window).
With the Application Tree dialog open, change the "Tree Mode" drop list back to "Procedure". Right-click on the "Main (Frame)" procedure and select "Module Source File".
This takes you into the Text Editor again, looking at the last source code you generated for the Main procedure. Again, any changes you made since the last time you generated code will not show up in this code.
You may have noticed that right below the "Module Source File" selection was another called "Embeditor Source". Do not confuse these two, they do very different things. We will demonstrate the Embeditor Source selection later in the lessons.
If you do make any changes to this code, you actually can compile and run the program to see what effect the changes make, however, your changes will be lost the next time you generate source code. Therefore, it is not a good idea to make any changes here. Close the source window. Save your work.
Make a backup of your work.
OK, What Did I Just Do?
Here’s a quick recap of what you just accomplished:
- You created a new .APP file, without using a wizard.
- You created an application Frame procedure, without using a wizard.
- You created a menu in your application frame.
- You created a splash screen procedure for your application.
- You created a toolbar under your application’s main menu and placed iconized, flat buttons on it.
- You used Clarion’s resize and alignment tools to adjust your screen design.
- You used a Control Template to populate your toolbar with a set of standard navigation buttons.
- You compiled and ran your work-in-progress to test its functionality.
In the next lesson, we’ll add a Browse procedure to the application.


No comments:
Post a Comment