This follows on from
Learning Clarion (Part 3). First, we are going to create a browse window, and then an update window.
These are the ones we created in the
Getting Started exercise 8 and following.
Lesson 7: Creating a Browse
In this lesson, you’ll create a browse window similar to the one created for you by the Application Wizard. The Application Generator uses the same templates, which generate the same basic code; but doing it this way, you’ll have a chance to "do it from scratch." This shows you just how much the Wizards do for you, and how you can do it all yourself, too. We start with the Customer browse window, using the Browse procedure template.
Double-click on "BrowseCustomers" in the Application Tree. This opens the "Select Procedure Type" dialog. Go to the "Defaults" tab and highlight the "Browse with Update and Select" Procedure template. Then press the "Select" button.
The "Procedure Properties" dialog appears. Type in a description as shown and go to the "Extensions" tab.
Click on the "Insert" button, and choose the "WindowResize" extension. Click "Select".
This Extension template generates code to automatically handle resizing and re-positioning all the controls in the window when the user resizes the window, either by resizing the window frame, or by pressing the Maximize/Restore buttons. Press the "OK" button to close the window resize template dialog.
Return to the "Properties" tab of the "BrowseCustomers" procedure properties, and click on the "Window" button.
Click on the window’s title bar, and open the Properties Pad (F4). Type "Browse Customers" in the Title property. Change the "FrameType" property to "Resizable". It's the top property in the list. Scroll down and find the "MaximizeBox" property and change it to "True". These steps allow the user to resize the frame at runtime.
Populating and Formatting a List Box Control
The List Box Formatter allows you to format the data in the list.
Right-click on the list box control, and select "List Box format ..."
Click on the "Add Field" button (circled in blue above). This opens the "Select Column" dialog. Click on "<ToDo>" and then "Add". Choose the "Customer" table and click "Select".
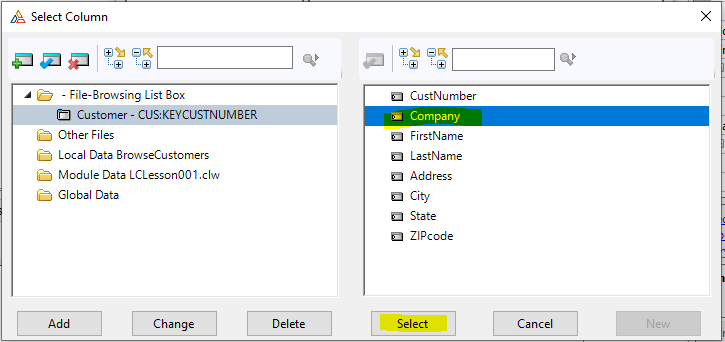
This adds the "Customer" table to the Table Schematic in the Select Column dialog, which now lists the table and its columns. With the "Customer" table selected, click on the "Change" button.
Highlight "KeyCustNumber" and press the "Select" button. This is important, because it sets the display order for the rows in the list. If you don’t specify a key, the rows appear in (sort of) whatever order they were added to the table (also called "Row Order").
Click on the "Company" field and then on "Select". This adds the "Company" field to the list box formatter.
Apply special formatting to the first column
The tabs on the right allow you to format the appearance of the column highlighted in the list on the left. In the Property list in the lower right pane, locate the "Right Border" and "Resizeable" properties and set them to "True". This adds a resizable right vertical border to the column at runtime.
Set the Header "Indent" property to 2 to slightly indent the heading text and verify that the "DataIndent" property is already set at 2.
Populate more columns
Click on the "add Field" button and choose the "FirstName" field from the "Customer" table. Click "Select" to add it to the list box. Check that the "Right Border" and "Resizeable" properties are set to "True". Repeat this process for the "LastName" and "Address" fields.
As the list box begins to grow, you can resize the List Box Formatter as needed to view additional elements.
Group some columns
With the "Address" field highlighted, click on the "Add Group" button. By creating a new group, in which you’ll place the address information, you can add a group header. This appears above the column headers, and visually links the data in the columns beneath. Notice that, as you add columns and make changes, you can see the effects of your changes in the sample list box at the top of the List Box Formatter dialog. Set the new Header Text to "Address Info". This provides the text for the group header. Then click on the "+" icon to expand the group, so you can see its fields.

Any columns appearing to the right of this one will be included in the group, until you define another group. As you add columns, the List Box Formatter continually updates its sample window (at the top) to show you how your list will appear.
Select the "Address" field and then click on the "Add Field" button to add the "City", "State" and "ZIPcode" fields.
You can use the editor to resize any fields as required. I have widened the "State" column for readability. Then click "OK" to close the List Box formatter.
Adding tabs
When the default Application Wizard created this procedure it had tab controls that changed the list’s sort order depending on which tab was selected. Therefore, we’ll add this functionality right now to show how easy it is to accomplish.
First, click on the window to get the "drag handles" and drag the bottom one down to make the window bigger.
Lasso all the controls on the window and then drag them down as shown, to make space at the top.
Display the toolbox, and drag the "SHEET" control to the top-left corner of the window.
Resize the sheet control by using the grab handles until the sheet covers the list box and all the buttons below it. Then right-click to the right of the "Tab1" and choose "Send to Back".
Click just below "Tab1" and change the Text to "by Customer number". We will set the display order of the list box to this order shortly. Then click on "Select SHEET" at the bottom of the properties window.
Notice that the grab handles have changed back to the entire sheet. Click on the "Add Tab" link, and then click below the text "Tab2" to select it.
Change the text to read "by Company Name".
Instead of clicking on "Select SHEET" at the bottom of the properties window, another way to return to the entire sheet control is to select it by name from the drop-down list at the top of the properties window. Try it now.
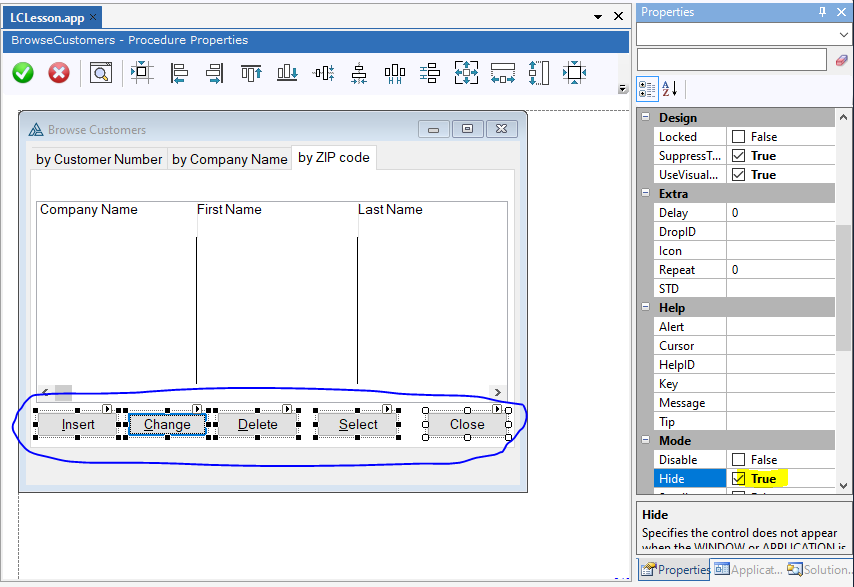
Select the third tab from the drop-down list as shown, and change the tab text to "by ZIP code".
Hiding the Buttons
The toolbar buttons defined on the Frame procedure actually just tell hidden buttons in the Browse procedure to do what they normally do. Therefore, when you are designing a Browse procedure without using the Wizards, you do need to have the update buttons on the screen, but the user does not have to see them at runtime. So let's hide them.
Click on the "Close" button. Then Shift-Click on the other buttons in the row to select them too. Change their "Hide" property to "True".
Select the LIST control from the properties dropdown list, and use the grab handles to make the listbox control use up more space on the window. It can cover the hidden buttons too, as shown.
Setting the Sort Orders
Now that the tabs are there, we need to tell the list box what alternate sort orders to use and when.
Right-click on the list box control and choose "Actions ..." or click on the "Actions ..." link at the bottom of the properties window.
Click on "Browse Box Behaviour" and then choose the "Conditional Behaviour" tab. Click "Insert".
Type "CHOICE(?Sheet1) = 2" in the Condition field. Then click on the ellipsis next to the "Key to Use" field, and select "KeyCompany" from the list of keys. Click the "Select" button, then the "OK" button.
The condition expression sets the condition under which the alternate sort order will be used. This expression uses the Clarion language CHOICE function to detect when the user has selected the second tab on the sheet. The generated code will use this expression in a conditional statement that will change the sort order at runtime.
Click on the "Insert" key to create another condition. Set the "Condition" expression to "CHOICE(?Sheet1) = 3" and select "KeyZIPcode" as the "Key to Use". Click "OK".
Now, when the user selects the second or third tab, the BrowseBox Control template will generate code to switch to the key on the Company or ZIP column. It doesn’t need to know what to do for the first tab because that always uses the Access Key we set in the Table Schematic. (Customer Number). Note that you can move the conditions around as required using the arrow buttons. Please click "OK" and "OK" to return to the Window Designer.
Click on the "Window Preview" button to see how the window will look. It still needs work, but at least we have a starting point. It's not a full working window, just a preview. Close the preview, and then use the green "Save and Close" button, followed by the green "Save and Exit" button.
Finally, use the "Accept changes" (Save) button to
save your work.
One Last Tweak
You may have noticed that the fonts used in the Window Preview were terrible. Let's fix that quickly. Click on the "Properties" button.
Now click on the ellipsis to the right of the "Window" button. This opens the "Structure Editor" that shows the code behind the window. The first line reads: "BrowseWindow WINDOW('Browse Customers')" etc. but notice there is no font statement.
So we add in ",FONT('Segoe UI') at the end of the line, to specify the default font for the entire window. Click on the green "Save and Close" button, followed by the green "Save and Exit" button. Then click on the "Accept changes" (Save) button.
Make a backup of your work.
OK, What Did I Just Do?
Here’s a quick recap of what you just accomplished:
- You created a new Browse Procedure, without using a wizard.
- You added an Extension Template to automatically make the new procedure’s window resizable.
- You used the List Box Formatter tool to design a scrolling list of rows.
- You added a Property Sheet and several Tabs to your screen design.
- You hid and moved buttons to provide a "cleaner" screen design.
- You used the Window Designer’s Preview mode to see your window design in action.
- You set dynamic sort orders for the user based on which Tab control they select.
Now that the first Browse procedure is complete, we’ll go on and create its associated Update Form procedure.
Lesson 8: Creating an Update Form
In the last lesson, we formatted the Customer Browse procedure’s list box and added tab controls to change the sort order. To finish the basic procedure, we name the Update procedure. This is the procedure that handles the action for the Insert, Change, and Delete buttons.
Select the "BrowseCustomers" procedure and click on the "Properties" button.
We have been here before. This time, click on the "Actions" button.
Type "UpdateCustomer" in the Update Procedure field at the bottom of the Procedure Properties dialog. This names the procedure to update the rows displayed in the browse. Click "OK". Then "Save and Exit". The new procedure appears in the Application Tree as a "ToDo".
Notice that you didn’t have to start a new execution thread for the update procedure. You want it to run on the same thread as the browse, so that the end user can’t open a form window to change a row, then activate the browse window again, and open another form on the same row. In other words, you don’t want a user trying to change the same row twice at the same time.
Creating the Update Form Procedure
The Update Procedure should use the Form Procedure template to create a procedure that the end user can use to maintain a row. It should provide a prompt and entry control for each column in the row.
Double-click on the "UpdateCustomer" procedure, change to "Defaults", choose the "FORM (Add/Edit/Delete)" template, and click "Select".
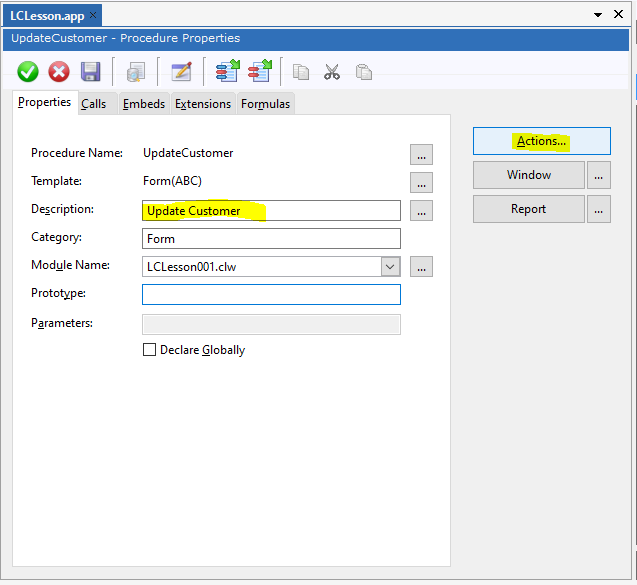
Type in "Update Customer" in the description field, and click on "Actions".
Notice that this dialog looks different from the Splash, Frame, or Browse Procedure Properties dialogs because the prompts vary for each type of Procedure template. The User’s Guide and on-line help describe the customization options available on each Procedure Properties dialog. We don't need to change any of the defaults, so click on "OK".
Find the "Data / Tables" (F12) panel in the bottom-left corner of the screen, and double-click on the "<ToDo>" section of "Update Record on Disk" (or use the "Add" button). Click on the "Customer" table and click "Select".
Make the Window Resizable
In the Procedure Properties dialog, select the "Extensions" tab. Click "Insert" and choose the "WindowResize" extensions template. Click "Select".
We don't need to change any of these defaults, so click "OK". Then click on the green "Save and Exit" button to return to the main application tree. Now click on the "Window" button to load the Window Designer.
Go to the "Properties" window (F4) and change the "FrameType" property to "Resizable". Find the "MaximizeBox" property in the "Options" group and set it to "True". These two properties ensure that the user can resize the window at runtime.
Populating the Columns
The default window design contains three controls for you already. The "OK" button will close the dialog, accepting the end user’s input, and writes the Customer table row to disk. The "Cancel" button closes the form without updating. The string control provides an action message to inform the end user what action they are taking on the row. Now we need to add the table columns to the form, so we can add or edit the data in a given row. Placing the columns in a window is called populating it.
From the main menu, choose "Window Designer", "Populate", "Multiple Columns".
When the "Select Column" dialog appears, choose the "Customers" table, "CustNumber" row, and "Select" button. The dialog will briefly disappear, as it waits for you to decide where to put the controls on the form. Move the cursor to the top left and click. The program places a caption and a data control on the form. Now do the same with each of the columns, until all the columns have a pair of controls on the form. Then click "Cancel" to remove the "Select Column" dialog.
You should end up with something like this. Note that you can also use the "Data/Tables" pad and drag and drop fields directly on the window. This seems a more logical way of doing things, and the cursor works better too. Try deleting the "ZIPcode" control and dragging it again from the "Data/Tables" pad instead.
Moving and Aligning Columns
For a professional look, we need to move these columns around and align the sides and bottoms of all the columns in the screen. First, we move the controls to their approximate positions on the form.
Click on the "State Code" input control, and then Shift-Drag it to the left, to move it closer to the "State Code" caption. Then use the grab handle in the middle of the right-hand side to make the input box a more suitable size, as shown above. Ctrl-Click on the "State Code" caption to select it as well. Shift-Drag the collection upwards and to the right of the "City" field.
Repeat the same steps with the "ZIP Code" controls. Note the blue "guidelines" that appear when you are dragging the controls, to help you line them up with the other controls. This is very useful to keep things uncluttered and professional.
Shift-drag the "City" caption closer to the "City" input field, to remove the large gap between the caption and the control. Shift-drag the "Address" caption to the right, until its right-hand side lines up with the right-hand side of the "City" caption below. Shift-drag the "Address" input control so that its left-hand edge is above the left-hand edge of the "City" input control. Then resize the address control until its right-hand edge lines up with the right-hand edge of the "Zip Code" control, as shown.
Click on the "City" caption. This becomes the anchor. Now shift-click on all the other captions on the left of the form, and then use the "Align Rights" button to align all the captions to the right edge of the anchor control.
Click on the "City" input field. This is the new anchor. Shift-click on all the input fields above it, and then use the "Align Lefts" button so that all the left-hand edges line up with the left-hand edge of the anchor field. You have created two (invisible) "sight lines", one to the right of the captions, and the other to the left of the input fields, that remove the clutter and make the form easier to read, like margins on a printed page.
Click on the "Last Name" input field, and then Shift-click on the "Last Name" caption. Move it up and to the right of the "First Name" input field. Click on just the "Last Name" input field, and widen it until its right-hand edge lines up with the right-hand edge of the "Zip Code" and "Address" fields. This is another sight line. Widen the "company" field to match up, too.
Select ONE input control from each line, and then use the "Spread Vertically" button to space them out evenly between the top and bottom controls. Don't panic when it doesn't move all the controls.
Select the "Address" input field as an anchor. Then shift-click on the "Address" caption and click on "Align Middles" to line them up. Select the "First Name" input field as an anchor. Shift-click on the "First Name" caption, the "Last Name" caption and the "Last Name" input field. Use "Align Middles" to line them up with the anchor. Try the same steps with "Company", "CustNumber" and "City" input fields (one line at a time) to make sure all the middles are lined up.
The end result should be something like this. The form window is almost done. Before you go any further,
save your work! Click on the "Save and Close" button to return to the Application Tree. Click on the "Accept Changes" (Save) button.
A Quick Font Tweak
From the Application Tree, select the "UpdateCustomer" procedure and choose "Properties" instead of "Window".
From the "Procedure Properties" screen, click on the ellipsis to the right of the "Window" button. This takes us to the Structure Editor". Add in ",FONT('Segoe UI') at the end of the first line, like we did in the previous lesson. Click on the green "Save and Close" button and then on the regular "Window" button to see the new font setting in action.
Control templates generate all the source code required to create and maintain a specific type of control (or set of controls) on your window. All the entry controls we just placed on this window are
simple controls, not
control templates, because they do not need any extra code to perform their normal function.
Control templates are only used when a specific control needs extra functionality that the "bare" control itself does not provide. For example, the OK and Cancel buttons are both control templates: the OK button’s control template saves the row to disk, while the Cancel button’s control template has all the "cleanup" code necessary to cancel the current operation.
Adding a BrowseBox Control Template
Now we will use the extra space and add a browse list box for the related Phone table rows. We will use a BrowseBox Control template that displays all the rows from the Phone table that are related to the current Customer row.
Select the "Control Templates" pad in the bottom right of the screen. Click on the "BrowseBox" control template and drag it to the screen, just below the "City" caption, and release it. The "Select Column" dialog box will appear. Double-click on the "<ToDo>" entry in the "File Browsing List Box" section and select the "Phone" table.
Click on the "Change" button and choose the "KeyCustNumber" key. Click "Select".
Notice how the Phone table is sorted by the "pho:KeyCustNumber" key. Select the "CustNumber" column on the right, and click "Select"
Adjust the size of the list box control to fit the space on the form, as shown here. I have also widened the "Action Message" to the right of the "Cancel" button to line up with the right-hand sight line.
Right-click on the browse box, and select "List Box format ..." from the popup menu.
The List Box Formatter now appears, ready for you to choose the rest of the columns to display. Change the "DataJustification" property to "Center". The default for numeric values is "Right". Also check the "Right Border" and "Resizable" properties are set to "True". This adds a right border to the column and allows the user to resize the column width at runtime.
Click on the "Insert Field" button, and choose the "PhoneNumber" field from the Phone table as shown. Click "Select".
Change the Header "Width" property to
62.
Use the "Insert Field" button to add the "Extension" and "Phone Type" fields, and set the header width of each of them to 56. Click on the "CustNumber" field and set the Header "Indent" property to 2. Click "OK" to close the List Box Formatter.
Right-click on the List Box and select "Actions ..." from the popup menu.
Click on "Browse Box Behaviour" and then find the ellipsis to the right of the "Range Limit Field" and select "PHO:CustNumber" to specify which field we want to limit the range on. Click "Select".
Change the "Range Limit Type" to "File Relationship" and then click on the ellipsis on the right of the "Related File" field. Choose "Customer" in the "Select Table" dialog, and click "Select". This identifies the Customer table as the related table. These steps limit the rows displayed in the list box to only those rows related to the currently displayed Customer table row. Click "OK" and "OK" to return to the Window Designer.
Save your work: click on the green "Save and Close" button, then on the "Accept changes" (Save) button, and then use the "Window" button to return to the Window Designer.
Now we need to make space for a row of buttons for the list box. Reduce the height of the list box and make the form slightly taller. Move the existing buttons down a bit, as shown above.
In the "Control Templates" pad, search for the "BrowseUpdateButtons" template, and drag it to the empty area below the Browse Box, as shown. Try to centre them below the list box, in a way that doesn't associate them with the "OK" and "Cancel" buttons below. We don't want to confuse the user.
Save your work: click on the green "Save and Close" button, then on the "Accept changes" (Save) button, and then use the "Window" button to return to the Window Designer.
The
Insert,
Change, and
Delete buttons are the buttons that will allow the toolbar buttons to function, so they must be present in the window design. They do not have to be visible to the end-user, so you can hide them if you choose. However, since this Browse Box is placed on an update form procedure, for this application we’ll leave this set of BrowseUpdateButtons visible. This will allow the user to use either set of buttons. The toolbar update buttons will only function for this list when the list box has focus (not when the user is inputting data into any other control) so keeping these buttons visible will ensure that the user can easily maintain the Phone table rows.
Specify "Edit in Place" for Phone Update
Right-click on the "Delete" button and select "Actions..." from the popup menu.
Check the "Use Edit in Place" box. Click "OK".
Save your work: click on the green "Save and Close" button, then the green "Save and Exit" button, and finally the "Accept changes" (Save) button in the Application Tree window to
save your work.
Setting the Actions for one button sets them for all three buttons in the set, because they all belong to the same control template. Since the "Phone" table is a small table with just a couple of columns, there’s no need for a separate update procedure.
Make a backup of your work.
OK, What Did I Just Do?
Here’s a quick recap of what you just accomplished:
- You created a new Form Procedure, without using a wizard.
- You learned just how quickly you can populate data entry controls onto a Form by using the Columnbox toolbox.
- You learned to use the Window Designer’s tools to move and align controls.
- You used the List Box Formatter again and created a range limited list box.
- You learned how to implement edit-in-place for simple updates which don’t require a Form procedure.
Now you’ve created all the procedures necessary to maintain both the "Customer" and "Phone" tables. In the
next lesson, we’ll create the procedures that will maintain the "Product" data table.